Ever wondered how Kubernetes networking actually works?
How do CNIs like Cilium, Calico, or Flannel magically give every pod its own IP address? How can a pod on one node communicate with another pod running on a completely different machine? And why does a brand-new Kubernetes cluster remain NotReady until you install a CNI?
Most tutorials simply tell you to run:
kubectl apply -f <cni-manifest>
A few seconds later, your nodes become Ready, CoreDNS starts running, and everything just works.
But what actually happened?
What did Kubernetes do behind the scenes? How did the container runtime know which networking plugin to execute? How did the CNI create networking for a pod? And how does Kubernetes eventually support pod-to-pod communication across an entire cluster?
In this series, we're going to answer all of those questions—not by reading diagrams, but by building our own CNI from scratch.
Starting with nothing more than a Kubernetes cluster created using kubeadm, we'll implement our own networking plugin step by step. Along the way, we'll learn how Kubernetes interacts with the container runtime, how Linux network namespaces make container isolation possible, how virtual Ethernet devices connect pods to the host, and eventually how production CNIs build overlay networks and enforce network policies.
By the end of this series, you'll no longer think of a CNI as a mysterious piece of software you install with a single command. You'll understand exactly what happens from the moment a pod is scheduled until it can communicate with every other pod in the cluster—and you'll have built the networking yourself.
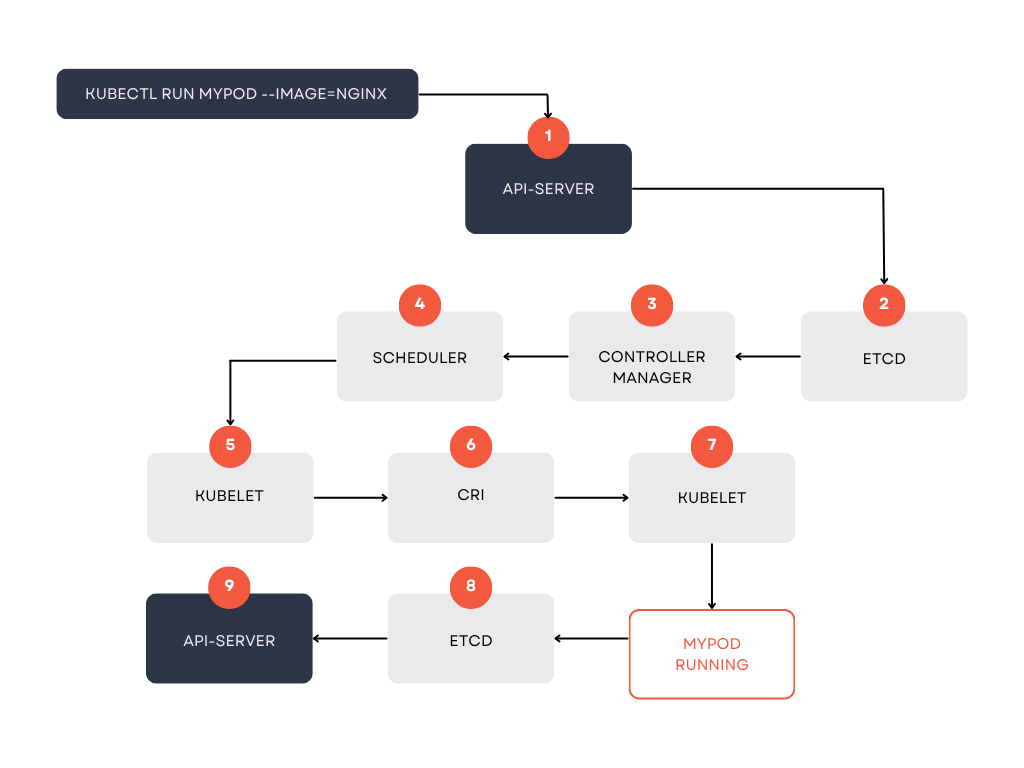
What Happens In Your Fresh Cluster
So you just finished creating your Kubernetes cluster.
Everything looked successful.
kubeadm init
You copied the join command and added two worker nodes.
kubeadm join ...
The nodes successfully joined the cluster.
You feel confident.
Then you decide to check the cluster.
kubectl get nodes
NAME        STATUS     ROLES           AGE
master      NotReady   control-plane   3m
worker-1    NotReady   <none>          2m
worker-2    NotReady   <none>          2m
That is strange.
Maybe CoreDNS is still starting?
kubectl get pods -n kube-system
NAME                       READY   STATUS    RESTARTS
coredns-...                0/1     Pending   0
coredns-...                0/1     Pending   0
Maybe scheduling a pod will tell us more.
kubectl run nginx --image=nginx
pod/nginx created
A few seconds later...
kubectl get pods
NAME    READY   STATUS
nginx   0/1     Pending
Nothing works.
CoreDNS is Pending.
Your application pods are Pending.
Your nodes remain NotReady.
What exactly is missing?
The answer is simple.
Your cluster has no networking.
More specifically, it has no Container Network Interface (CNI).
In this article—the first in a seven-part series—we'll understand what a CNI actually is, why Kubernetes depends on it, and how it fits into the lifecycle of creating a pod.
By the end of this series, we won't just understand CNIs.
We'll build one ourselves.
What We'll Build Throughout This Series
Rather than installing an existing CNI like Calico, Cilium, or Flannel, we're going to build our own.
By the end of the series, we'll have implemented networking that supports:
- Pod to host communication
- Host to pod communication
- Pod to pod communication on the same node
- Pod to pod communication across different nodes
- Node to node routing
- Network cleanup when pods are deleted
- Basic network policies
The goal is not to compete with production CNIs.
The goal is to understand exactly how Kubernetes networking works underneath the abstraction.
Once you understand this, reading the source code of projects like Calico or Cilium becomes significantly easier.
Prerequisites
To follow along, you'll need:
- Three Ubuntu virtual machines
- One control plane
- Two worker nodes
- kubeadm
- kubelet
- kubectl
- containerd
Nothing else.
We intentionally will not install a CNI plugin.
The cluster should remain in its broken state until we fix it ourselves.
Why Is Everything Broken?
Let's investigate.
If we describe one of the worker nodes, Kubernetes tells us exactly what's wrong.
kubectl describe node worker-1
Near the bottom you'll typically find something similar to:
Ready              False

Reason:
NetworkPluginNotReady

Message:
container runtime network not ready:
NetworkReady=false
reason:NetworkPluginNotReady
message:cni plugin not initialized
That message tells us everything.
The kubelet successfully contacted the container runtime.
The runtime works.
But the runtime cannot provide networking because no CNI plugin exists.
Let's inspect one of the pending CoreDNS pods.
kubectl describe pod coredns-xxxxx -n kube-system
The Events section usually contains something similar to:
Warning FailedCreatePodSandBox

Failed to create pod sandbox:

network plugin not initialized
Notice something important.
The pod itself isn't failing.
The container image isn't failing.
The scheduler isn't failing.
Kubernetes simply cannot create the pod sandbox because networking has not yet been configured.
Before any container starts, Kubernetes expects someone to provide networking.
That "someone" is the CNI plugin.
So What Exactly Is a CNI?
CNI stands for Container Network Interface.
Many people think a CNI is simply "software that gives pods IP addresses."
That is only a small part of its responsibilities.
A CNI is actually a specification.
It defines how a container runtime communicates with networking software.
Think of it as a contract.
The container runtime says:
"A new pod has been created. Please configure networking for it."
The CNI plugin performs the networking work.
When finished, it returns the networking information back to the runtime.
The runtime then tells kubelet.
Kubelet reports success to Kubernetes.
The official CNI specification is maintained by the Container Networking project and defines exactly how this communication occurs.
The CNI Specification
One important thing to understand is that CNI is not a Kubernetes project.
It is an open specification maintained by the Container Networking project that defines how container runtimes communicate with networking plugins.
The official specification can be found here:
This repository contains:
- The official CNI specification
- Reference libraries
- Sample plugins
- Documentation for CNI developers
Throughout this series we'll build our own implementation while following this specification.
Before We Talk About Networking, Let's Talk About Pod Creation
To understand where the CNI fits, we first need to understand how Kubernetes creates a pod.
Suppose we execute:
kubectl run nginx --image=nginx
Several Kubernetes components become involved before a single container starts.
Step 1 — The API Server
Every request made using kubectl first reaches the Kubernetes API Server.
The API Server validates the request, performs authentication and authorization, and if everything looks good, writes the desired state into etcd, Kubernetes' distributed key-value store.
At this point, Kubernetes simply knows:
"The user wants an nginx pod."
No pod has actually been created yet.
Step 2 — etcd
Think of etcd as the source of truth for the cluster.
Every Kubernetes object is stored here:
- Pods
- Nodes
- Deployments
- Services
- ConfigMaps
- Secrets
Whenever something changes in the cluster, the updated desired state is first written into etcd.
Step 3 — The Controller Manager
The Controller Manager continuously watches the API Server for changes.
It compares the desired state stored in etcd with the actual state of the cluster.
For example, when it notices that a Pod should exist but doesn't yet, it creates the work that eventually gets picked up by the scheduler.
Its responsibility is simply to ensure Kubernetes is always moving toward the desired state.
Step 4 — The Scheduler
The Scheduler now notices there is a pod waiting for a node.
It evaluates several factors such as:
- Available CPU
- Available memory
- Node affinity
- Anti-affinity
- Taints and tolerations
- Resource requests
Eventually it decides:
"Worker-2 should run this pod."
It writes that decision back through the API Server.
Step 5 — The Kubelet
Every kubelet continuously watches the API Server.
Worker-2 eventually notices:
"A pod has been assigned to me."
The kubelet now asks the container runtime to create the pod.
In our case, the runtime is containerd.
Step 6 — The Container Runtime (CRI)
The container runtime first creates the Pod Sandbox (Pause container).
Before any application container can start, networking must exist.
The runtime therefore invokes the configured CNI plugin to configure networking for this new pod.
This is where our story really begins.
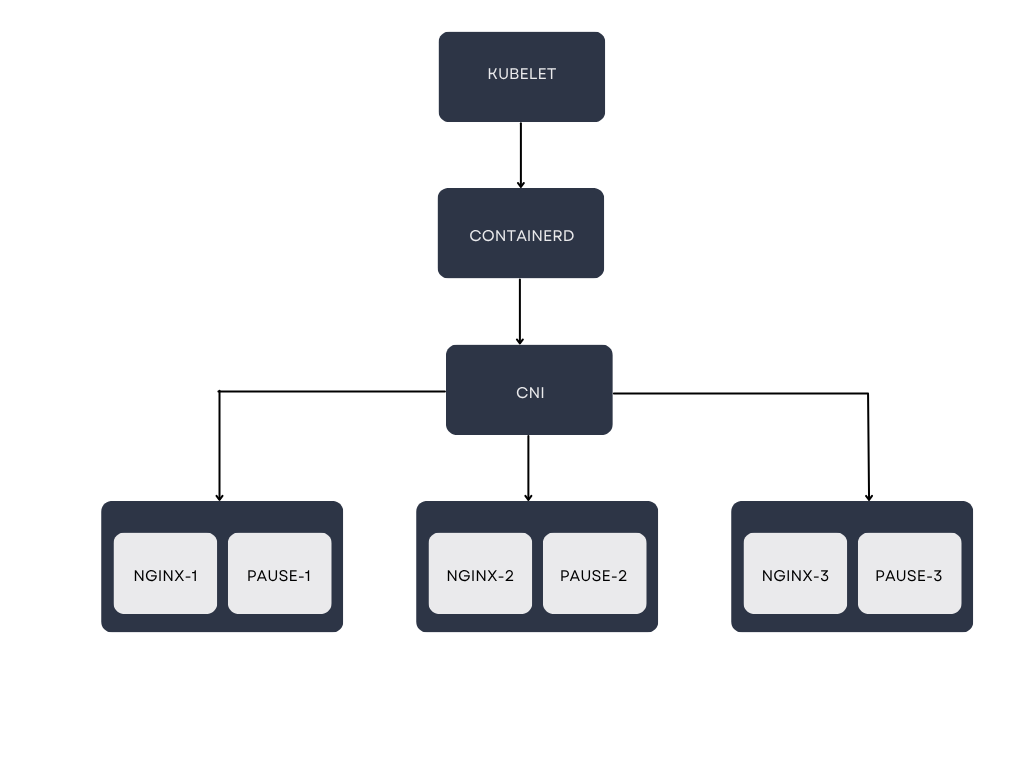
Linux Namespaces vs Kubernetes Namespaces
Before networking can exist, Linux first needs somewhere to place that networking.
This introduces one of the most commonly misunderstood concepts.
A Linux network namespace is completely different from a Kubernetes namespace.
A Kubernetes namespace is simply a logical grouping of Kubernetes resources.
A Linux network namespace is an operating system feature built directly into the Linux kernel.
Every network namespace has its own:
- Network interfaces
- Routing table
- ARP table
- Firewall rules
- Loopback interface
Each namespace behaves like an independent machine.
Processes inside one namespace cannot automatically see the networking configuration of another.
This isolation is exactly what containers rely on.
The Pause Container
One surprising detail about Kubernetes is that your application container is not the first container that gets created.
Instead, Kubernetes first creates a tiny container called the pause container.
Its job is almost nothing.
It simply sleeps forever.
That sounds useless.
It isn't.
The pause container owns the network namespace for the pod.
Every other container inside the same pod joins that namespace.
This is why containers inside a pod share:
- One IP address
- One loopback interface
- The same network interfaces
Without the pause container, Kubernetes would have nowhere to attach networking.
How Does the Runtime Find the CNI?
Once the container runtime creates the pod's network namespace, it needs to discover which CNI plugin should configure networking.
It first looks inside:
/etc/cni/net.d/
This directory contains one or more CNI configuration files.
Interestingly, the runtime simply reads the first configuration file it finds.
For example:
{
  "cniVersion": "1.0.0",
  "name": "my-cni",
  "type": "my-cni"
}
On one of my worker nodes, that configuration looks like this:
root@worker2:~# cat /etc/cni/net.d/10-my-cni.conf
{
  "cniVersion": "1.0.0",
  "name": "my-cni",
  "type": "my-cni"
}

root@worker2:~# ls /opt/cni/bin/my-cni
/opt/cni/bin/my-cni
The type field is particularly important.
It tells the container runtime which executable it should run.
In this case, the runtime looks for an executable named my-cni inside:
/opt/cni/bin/
Once it finds the executable, it launches it and passes several environment variables describing the pod being created.
Some of these include:
CNI_COMMANDCNI_NETNSCNI_IFNAME
Additional information is also passed through standard input.
From this point onward, Kubernetes steps aside.
Our CNI plugin is now responsible for configuring networking for the pod.
What Does the CNI Actually Do?
This is the heart of every CNI plugin.
Its responsibilities include:
- Creating networking for the pod
- Connecting the pod to the host
- Assigning IP addresses
- Configuring routing
- Returning networking information back to the runtime
One of the first things nearly every CNI creates is a virtual ethernet pair, commonly called a veth pair.
Think of it as a virtual network cable.
It always has two connected ends.
Anything entering one side immediately appears on the other.
One end lives inside the pod's network namespace.
The other remains on the host.
This virtual cable becomes the bridge between the pod and the Linux host.
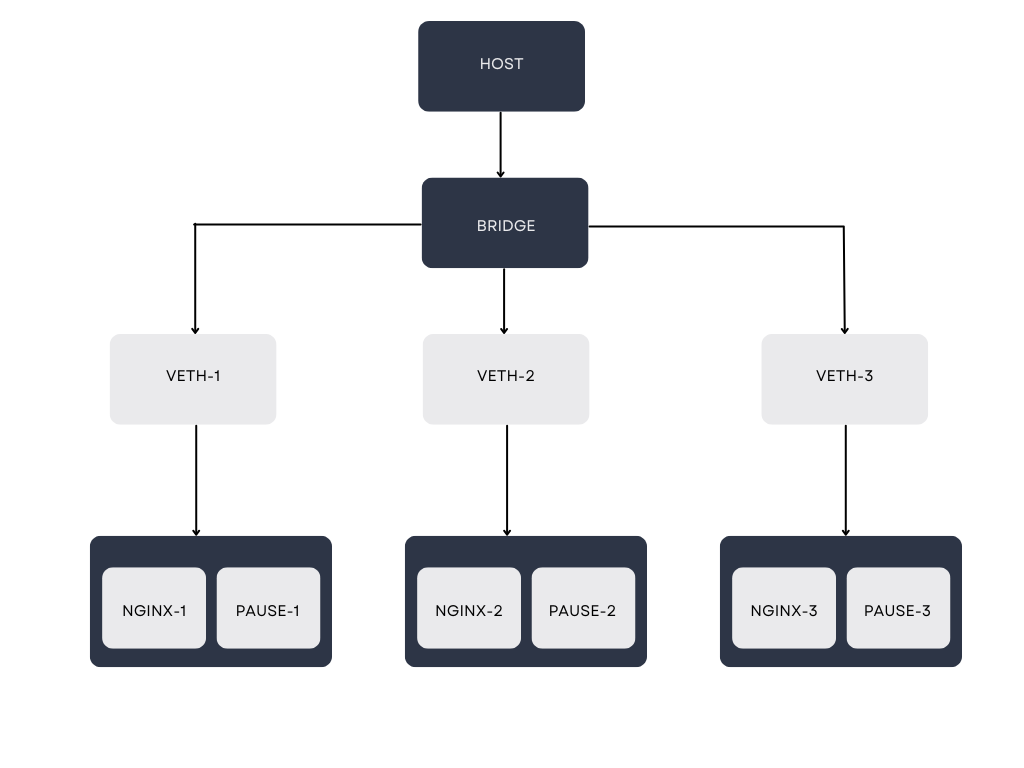
Once the interfaces exist, the CNI assigns IP addresses, configures routes, and ensures traffic knows how to move between the pod and the host.
When all of that succeeds, the plugin returns the networking configuration to the container runtime.
The runtime informs kubelet.
The kubelet reports success back to Kubernetes.
Only then is the pod considered ready to start.
An Interesting Detail Most People Don't Know
Here's something that surprises many Kubernetes users.
Once networking has been configured, the CNI plugin is no longer involved with that running pod.
In fact, you could completely remove the plugin binary after the pod starts and the existing pod would continue communicating normally.
Why?
Because the networking configuration already exists inside the Linux kernel.
The CNI isn't forwarding packets.
It only configured Linux networking.
The plugin becomes necessary again only when:
- A new pod is created
- A pod is deleted
- Networking needs to be cleaned up
This distinction is important because it changes how you think about CNIs.
They are primarily configuration software, not packet forwarding software.
What's Coming Next?
At this point we understand:
- Why Kubernetes refuses to become Ready without a CNI
- How pod creation reaches the CNI
- Why Linux network namespaces exist
- Why the pause container exists
- How the runtime discovers CNI plugins
- The responsibilities of a CNI plugin
In the next article, we'll stop talking about concepts and begin building our own CNI.
We'll manually create the networking for a pod, connect the host to the network namespace, assign IP addresses, and make the first packets successfully travel between the host and a Kubernetes pod.
From there, we'll continue expanding our implementation until pods can communicate across multiple nodes and eventually enforce network policies.
Continue with Part 2.
References
This series is heavily inspired by the official CNI specification and countless hours spent reading the implementation.
If you'd like to dive deeper alongside this series, I highly recommend these resources:
Official CNI Specification
This repository defines the specification every compliant CNI plugin follows.
Demystifying CNI
This excellent talk was instrumental in helping me understand the interaction between Kubernetes, the container runtime, and the CNI plugin before beginning this implementation.
This series builds upon those concepts by implementing a working CNI completely from scratch.